Thursday, August 16, 2012

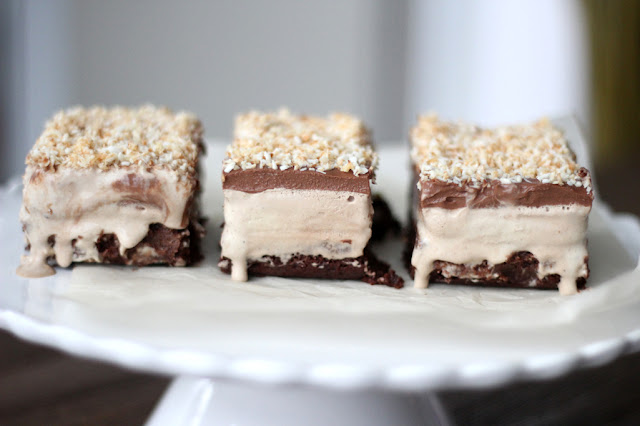
Chocolate Coconut Brownie Ice Cream Bars


Craving something cold and sweet to help you wind down the last of these sticky summer days?

'Cus I know I sure am. 


Or maybe you're looking for something a little different, a little decadent, to impress your friends at your next gathering?


This might just work.


Bonus, if you've got friends or family with allergies, who normally can't take part in the dessert table... you know, the ones who sit pouting in the corner when the birthday cake is cut? (Not guilty).

This is a super easy way to put a smile on their face. With a few tweaks here and there, it can easily be gluten free, dairy free, or even vegan.


I wouldn't call this a recipe so much as... an idea. It's stupidly easy, you can customize it to no end, and the results are nothing short of AMAAAAZING.

In my humble opinion.


I totally cheated on this recipe, I made the brownies from a mix and used store bought ice cream. I don't think this compromised its deliciousness in anyway, but if you are more ambitious than I, you can go right ahead and make all the components from scratch and then combine them as I did. In fact, please do! But make sure to invite me over :)

If you go the lazy route like I did, just use your favourite brownie mix and ice cream flavour. I used this mix from Pamela's Product's and the Cappuccino flavour of Luna & Larry's Coconut Bliss ice cream, which tastes like my most recent Starbucks obsession, coconut lattes! All of my ingredients were free of gluten and dairy. To make it vegan, you can probably just use an egg replacer instead of the eggs in the brownie mix. Or go ahead and use all the eggs and butter and real cream you want, it's your dessert!


Chocolate Coconut Brownie Ice Cream Bars (Gluten and Dairy Free Optional)


Ingredients:

1 Batch of brownies, from scratch or a mix - baked and cooled
1 Pint or 2 cups ice cream, softened slightly
1 Cup coconut chocolate ganache, recipe below
1 Cup unsweetened shredded coconut, toasted

1. Bake brownies according to package directions at least a few hours in advance, I recommend doing this a day ahead, and allow them to cool fully. I baked mine in a 7X11 Pyrex, but an 8X8 will work too.

2. Use a spatula to gently spread the softened ice cream in an even layer over the brownies, cover and place in the freezer until firm, about 2 hours.

3. While the ice cream is in the freezer, whip up the ganache and leave to cool. At the same time, toast the coconut in a pan over low heat, until just golden brown, and set aside.

4. When the ice cream layer is frozen solid, pour the coconut ganache over the ice cream as evenly as possible, use a spatula to guide it to the edges and into the corners. As you can see, my ganache was still a bit warm and melted some of the ice cream, so my layers aren't perfect. Don't worry if yours are a little wonky too, it still tasted great.

Sprinkle with as much or as little of the toasted coconut as you'd like, then cover and freeze the whole thing until the ganache is set, at least 1 hour. Remove from the freezer and thaw until it is soft enough to cut. Divide into squares, serve and enjoy!


Chocolate Coconut Ganache (Dairy Free)


Ingredients:

16 Ounces dark, dairy free chocolate
1 (15 Ounce) can full fat coconut milk

1. Chop the chocolate into rough chunks and place in a heat proof bowl, set aside.

2. Heat the coconut milk over medium low heat until it begins to steam and bubble at the edges, remove from heat just before boiling. Pour the coconut milk over the chocolate and let stand for 5 minutes before stirring. Beat with a whisk to combine, until the chocolate mixture is smooth and glossy. Refrigerate to cool.


You know what I'm thinking? Chocolate Peppermint Chip Brownie Ice Cream Bars. Yes please.

Wednesday, August 1, 2012

Honey Lime Grilled Salmon with Fresh Fruit Salsa


This recipe is inspired by (slash-stolen-from) one of my favourite bloggers - Jessica at How Sweet It Is. Jess if you read this - imitation is the sincerest form of f-OMG I CAN'T BELIEVE YOU'RE READING MY BLOG I LOVE YOU!!!

Ahem.

Sorry. I'd better stop before this gets embarrassing. See, when it comes to food blogs and me, "following" is really just another way of saying "stalking". I can get a bit... obsessed. Just a bit. I can't even begin to imagine what I would do if I MET my blogging idols - pass out?

Oh right, that happened. Hi JOY!


But seriously? How could you not love someone who comes up with things like Bourbon Marshmallow Smores with Bacon? For real. Also, I feel like we have a lot of things in common - mainly a nostalgia for/love of any and all things 90's. Plus an obsession with the show Girls and an aversion to doing dishes. And then theres that whole food thing... yeah I kinda like it too.

Most importantly, I have to thank Jess for bringing something as amazing as fruit salsa into my life. WHY did I never think of this before??? It's ridiculous. After procrastinating forever I finally made up a batch in my food processor last week - it took all of about 20 seconds - and holy cow this stuff is delicious. And addicting. And delicious.


Tip: If you are like me and get squeamish with salmon skin, this is a great way to grill a lovely, moist skin-on filet, and leave the skin behind on the grill. Works with pretty much any fish! Listen up. Start the fish skin side UP on the grill, flip it over half way through cooking time so that the skin side is DOWN. When the fish is cooked all the way through, take the edge of a metal spatula and gently wiggle it between the flesh of the fish and the skin. If the fish is fully cooked, it should slide easily onto the spatula, leaving the icky skin behind on your grill. Ta daa! Now just make sure you get a grownup to clean the grill for you.

Now get grillin!


Honey Lime Grilled Salmon with Fresh Fruit Salsa

Inspired by Honey Lime Tilapia by How Sweet It is.

Ingredients
2 Salmon filets 
1 Tablespoon olive oil 
2 Tablespoons honey
Juice of 2 small limes
Zest of 1 lime
1 Garlic clove, crushed
1/2 Teaspoon salt 
Additional honey and lime juice for drizzling

1. Place the salmon in a dish or container. In a small bowl, combine the ingredients for the marinade, whisk well and pour over top of the fish. Cover and refrigerate for about 30 minutes to 1 hour.

2. To grill the salmon, preheat your grill to medium high, brush the  grates clean and lightly oil them (I use olive oil in a mister) then place the salmon skin-side-up on the grill, and close the lid. After about 4-5 minutes, depending on the thickness of your fillets, the fish should begin to turn opaque. Use tongs to gently flip your fish over so that it is now skin-side-down. Give it another 3-5 minutes on the grill, until the salmon is completely opaque. Much longer and you risk drying out the fish. As I said above, you can keep the skin on, or you can remove it by gently sliding a spatula between the fish and the skin, leaving the skin behind on the grill.

3. Combine about a tablespoon each of honey and lime juice in a small bowl and drizzle over the freshly grilled salmon.


Blueberry Lime Salsa

By How Sweet It Is. 
This recipe is pretty much a replica of Jessica's Salsa. The only difference is that I left out the avocado, since I'm a weirdo and couldn't handle combining all these textures.

Ingredients
1 Cup fresh blueberries
5-7 Strawberries
1/4 Red onion, roughly chopped
Juice and zest of two limes
1/3 Cup cilantro leaves
Salt and pepper to taste

Combine all ingredients in a food processor or blender and pulse, about 5-6 times or until you reach a desired consistancy. Taste and season with salt and pepper if desired. Makes about 1 1/2 cups.

Top the salmon with a generous amount of fruit salsa. Serve on a bed of black rice. Because its purdy.